Do you want to create digital stickers that are personalized to your needs, but have no idea how to get started? In this post, I’ll show you how to make digital stickers in PowerPoint.
Microsoft PowerPoint is an excellent program for all things digital planning. You can create digital planners and digital notebooks easily using them, but one of my favorite ways to use is to create digital stickers.
Please note that in order to be able to export the designs you create as a PNG file (with transparent background) you need to be using the desktop app version of PowerPoint. I tried to create this sticker with the free version of PowerPoint online and wasn’t able to export the images.
So now you are in the desktop version of Powerpoint let’s get to the tutorial!
We may get commissions for purchases made through links in this post. For more information go to Disclaimer & Disclosure.
How To Make Digital Stickers In PowerPoint
Creating Digital Stickers can seem a little daunting when you first start but using Powerpoint is an easy way to create personalized stickers.
You can use these for any Digital file but they really help your digital planners or digital notebooks be more personalized and stylish. I enjoy using them to make important information stand out and to bring different seasons and themes into my Digital Planner pages.
Here are the simple steps to take to create Powerpoint digital stickers:
1. Go go ahead and start Powerpoint.
2. Create a blank presentation and then delete the title box that automatically appears inside the first slide.
3. Inside PowerPoint, you can insert either shapes or icons. These can be used to create your personalized digital sticker.


Think of what kind of sticker you want to create then search for the best shape or icon to help you create that design.
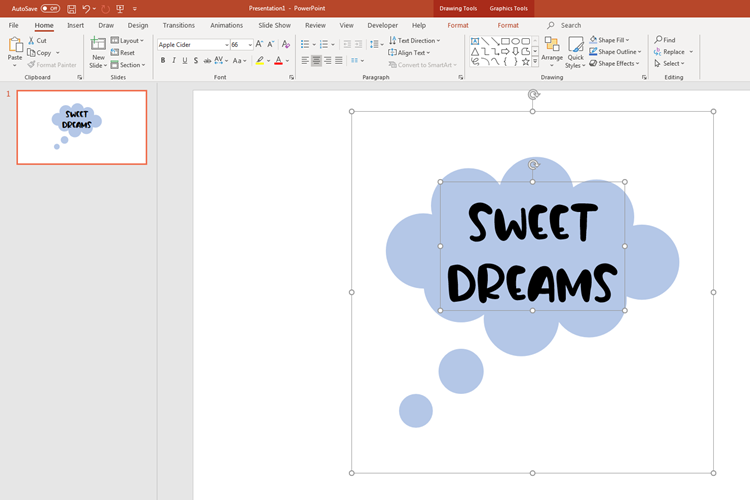
For this example, I’m going to create a ‘Sweet Dreams’ digital planner sticker. I found a cloud icon that is going to be great to help me create this.
You are only limited by your imagination…so have fun with this step and think outside of the box.
4. Increase the size of the icon or shape that you chose by clicking on the shape and then dragging out the shape with your mouse. This will make your digital sticker have a better resolution when you export it to your Digital Planner.
A better resolution means your sticker will look clearer and crisper.

5. Now it’s time to format your chosen icon.
You can do so many things to take it from a plain icon to the base of your Digital Sticker! Some ideas are to change its color, add shade effects, add outlines, the list is endless. Be sure to play around and have some fun experimenting.
You can find all the format options on the top toolbar of the Powerpoint app screen
Also, now you can add your text and choose a font you like.
To add text go to the Insert tab. Next, click on Text Box and drag your mouse to select the text box area.
Just start typing to create the text you want. You can move this around on your icon by using your mouse.
To format your text make sure you are in the Home tab then simply go over the text with your mouse to highlight the words you want to format. Now you can change the font, font size, change color of the font, and more.

6. Once you have your design exactly how you want it you are ready to turn it into a digital sticker! To do this you group the text and the shape to create one element.
To do that select both elements at once, and then press Ctrl + G.
Once they are grouped, you can move the elements together and edit them as one piece. Here you may want to do some final tweaks to the stickers as a whole.
7. To export your design as a digital sticker, you have to right-click over the design and then click on ‘Save as picture’.

This will export the image as a PNG file that has a transparent background.
Why is it important a digital sticker has a transparent background?
So that your sticker can be applied smoothly to any page in your Digital Planner. For example, if it has a white background, and you placed it on a page you would have a white box around the sticker that could cover bits of text, or look odd on a colored planner page.
Once you have created all your personalized stickers, all you have to do is to add them to your digital planner or your digital notebook.
And this is how you make stickers for PowerPoint planners.
PowerPoint isn’t the only program you can use to create stickers. In fact, you can create stickers in a variety of ways using programs such as Keynote, Canva, Google Slides, Affinity Designer and Procreate.
Short on time and want Digital Stickers NOW? Check out our premade Digital Stickers HERE
Want a quicker and easier way to create Digital Stickers? Check out or easy-to-use Digital Sticker System HERE!
Check out more easy Digital Planning tutorials below.
More Resources For Digital Planners:
PIN FOR LATER!


