Want to learn how to open a digital planner in your Noteshelf App? Read this easy step-by-step tutorial on how to import a digital planner to Noteshelf app on iPad or Android.
Are you shopping around for a great notetaking app to use for digital planning? If so, then the Noteshelf App ticks all right the boxes.
I love that Noteshelf is available on both the App Store and Google Play store.
To use your Digital Planner efficiently you need to download a Note-taking App. The problem is that there are so many Notetaking Apps that are only available for iPad users and that totally ignore android users.
I have personally used Noteshelf for my digital planning and the best part is that it is super simple to import a Digital Planner to Noteshelf.
Even if you are a beginner in Digital planning it won’t take long for you to have your Digital Planner up and running with this easy Noteshelf tutorial!
Want To Try Another Android Notetaking App? Learn Why Penly Is Our New Go-To App For Android Digital Planning
We may get commissions for purchases made through links in this post. For more information go to Disclaimer & Disclosure.
So, let’s get started!
The tutorial below covers the first thing you will need to do once you have either purchased or created your own digital planner. This is to import your digital planner file into Noteshelf so you can start planning.
Looking for a Digital Planner For Noteshelf? Try our Digital Journal Kit…we promise you are going to LOVE it! There is a version available for both iPad and android users so be sure to check it out.
Read our easy-to-follow instructions on how to import a Digital Planner to Noteshelf below or watch the video for the full tutorial.
How to add a digital planner to Noteshelf
There are two ways in which you can open or import a digital planner to Noteshelf, I will explain both methods below.
1st Method: Open Document from inside the app
The first way is to import a Digital Planner to Noteshelf from inside the app.
So go ahead and open your Noteshelf App either on your iPad phone or Android device.
Click on the plus sign at the top right corner to import a file. The app will open a window showing your folders.
Now proceed to find the document ( your Digital Planner) that you want to import.
You can import files from your device folders, or from Cloud Storage providers such as iCloud, Dropbox, Google Drive, or Microsoft OneDrive. For instance, my file is in a folder inside my OneDrive.
Once you find what you are looking for, you just need to tap on it and wait for the app to import that file.
You should now be able to find your document inside your Noteshelf library and then start using it.
In the video above I demonstrate how to insert a black paper digital notebook from inside the app, here’s the link to our digital notebooks if you would like to check it out.
2nd Method: open document from storage location
The second way to import a document into Noteshelf is to first locate the file inside your device.
Here again, your file could be stored locally or in the cloud.
Once you find the file you are looking for, you must tap on it and hold to select it. Then press ‘share‘ at the top to open the options.
Sometimes you’ll find your favorite apps at the top of this carousel. If that’s not the case, you can try to search for it further by pressing the three dots at the end of the carousel.
If you still can’t find it, then go back to the previous window and select the option ‘Send File‘.

Click on ‘Send File‘
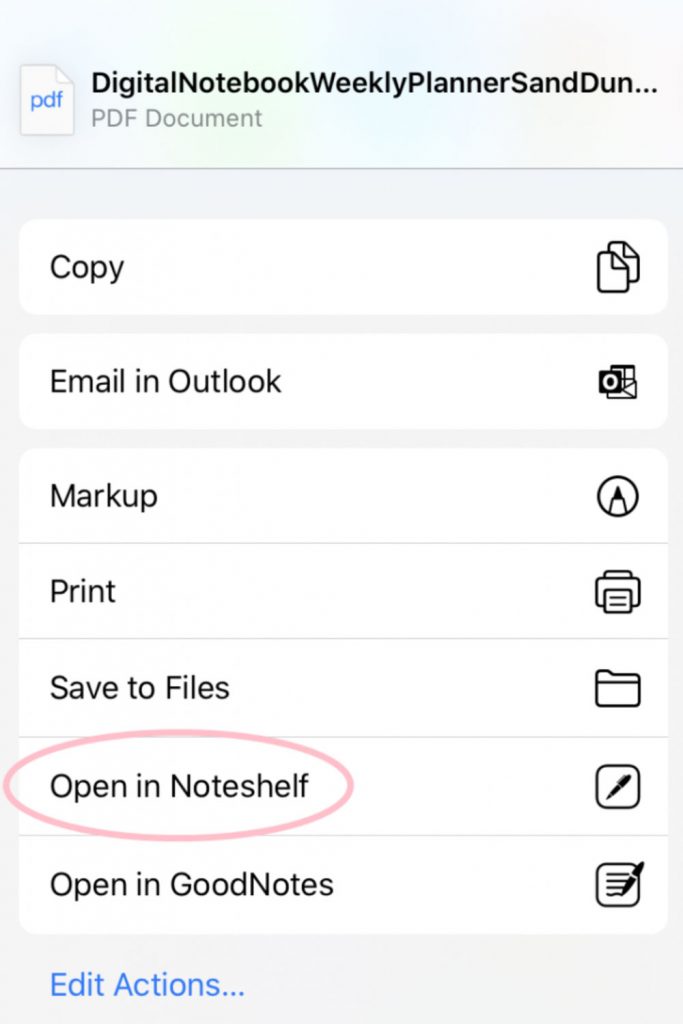
Now choose the option ‘Open in Noteshelf‘ to import the document.

Click ‘Open in Noteshelf‘
Check Out More On How To Use Noteshelf: All Our Noteshelf App Tutorials
Once you open your app again, it will give you the option to insert the new file into an existing document or to create a new document. Click ‘Create New‘ to create a new document.

Create a new document to add the digital planner to your Noteshelf library
You should see it in your library. Just click on the file to start planning.
Now that you know how to import a Digital Planner to Noteshelf you can easily rename the file to something that is personal to you. Tap and hold onto the file. An option will then appear which will allow you to rename the digital planner in Noteshelf.
Looking for great Digital Planning products? Check out the Etsy shop for everything from goal planners to digital stickers and more.
More Noteshelf digital planning resources:
PIN FOR LATER!


