Want to learn how to backup and auto sync files across devices using Noteshelf app for iOS. Here’s a quick tutorial on how to sync Noteshelf files and notebooks to your iPad and iPhone.
It’s great to have a backup of all your files so you don’t ever have to worry about missing or losing any of your data. Auto syncing allows you to have your data on more than one device so you can access it easily from various locations.
Below is a quick tutorial for how you can backup and sync your files inside the Noteshelf app on different devices. Be sure to follow along with the video for easy reference.
We may get commissions for purchases made through links in this post. For more information go to Disclaimer & Disclosure.
How to backup and sync Noteshelf Files (for iOS users)
Backup files in Noteshelf
Firstly, it is a good idea to make sure that you can backup any or all of your files inside Noteshelf.
To be able to backup your files you need to go into the Noteshelf ‘settings’ tab, which is located at the top left corner of your dashboard. Then tap on ‘Cloud & Backup’.
In this tab, you can set your auto-backup and also choose from a variety of cloud service providers. You can choose between Google Drive, OneDrive, Dropbox, Evernote or just simply use iCloud.
If you tap on the ‘auto-backup’ tab now you have the opportunity to choose which notebooks you want to backup.
Just look inside your folders and tap on the notebooks you want to backup.
Once you tap to select the notebooks the backup process will start straight away.
You can normally see in the ‘Cloud & Backup’ tab when the last time that your files were backed up.
Sync files between devices using Noteshelf
It Is important to remember that to be able to sync files between your iPad and iPhone you must have the app on both devices.
You can also sync audio files between your Apple Watch. This means you will need a one-time purchase app for all of these devices. However, if you want to be able to see your notes on your Mac you must also purchase the Noteshelf app in the Mac App Store.
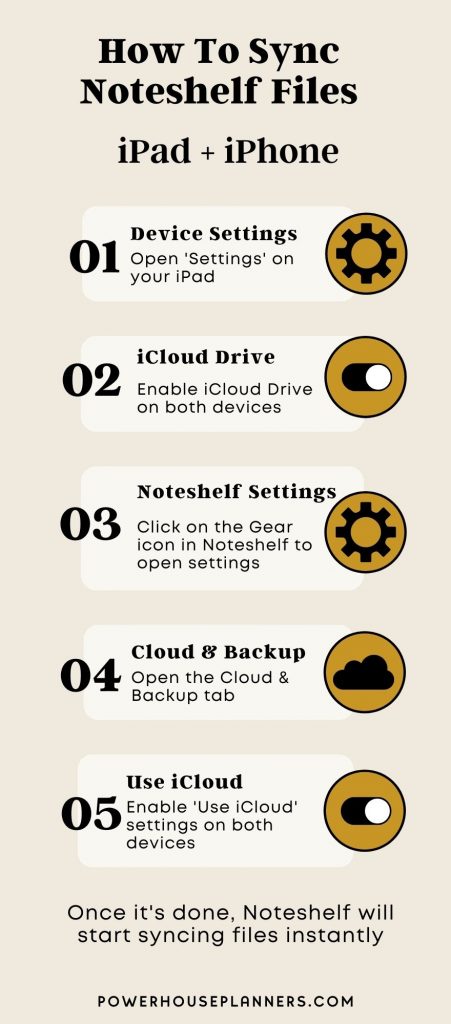
You can only auto sync via iCloud so make sure that this is turned on inside the app for both devices, under the ‘Cloud & Backup’ tab.
You also need to have iCloud Drive toggled on and enabled for Noteshelf in both your iPad and iPhone settings.
To do this on your devices, go to ‘Settings’ and tap on your Apple ID at the top. Then tap on ‘iCloud’ and toggle iCloud Drive on.
And that’s the only thing you have to do. Once you do that all your files will start syncing automatically.
It can take some time the first time you do a backup, especially if you have lots of documents you want to backup. You will see a little arrow at the top of each notebook showing you that your documents are syncing.
Once the notebooks are synced the arrow will go away and the documents will auto sync again after you make any edits to your files.
If you have lots of documents already in your Noteshelf dashboard then I would just suggest you set auto sync and leave your iPad and your phone there for a while to sync.
Once all files are synced then the new edits sync pretty fast as long as you have a strong internet signal.
You may also like: How To Create A Realistic Digital Planner
So here’s the summary:

More Noteshelf Tutorials:
PIN FOR LATER!


