Learn how to add a Digital Planner to GoodNotes with this easy tutorial on how to import documents to GoodNotes. Start Digital Planning today, even if you’re a total beginner.
GoodNotes is a note-taking app that allows you to use a digital GoodNotes planner to plan your life without missing any of the features that you love in a traditional paper planner.
It is possible you can start Digital Planning without purchasing a Planner now that there are free planner templates in the latest version of the app. These allow you to create a digital planner in GoodNotes. Although they can be a great starting point for Digital Planning, the GoodNotes planner templates are very limited in terms of customization and colors.
If you really want to take advantage of all the amazing benefits and features of Digital Planning then you might soon find yourself shopping for some colorful design that will bring a spark to your daily planning and includes some of the best things about Digital Planning like Hyperlinks.
Looking for a great Digital Planner For GoodNotes? Try our Digital Journal Kit…I promise you are going to LOVE it!
Perhaps you will even want to design a digital planner yourself in the future!
Either of these means will need to learn how to import a digital planner to GoodNotes.
Although it can seem overwhelming when you first start Digital Planning, it’s very simple to get started.
Keep reading and I’ll show you just how easy it is to add a Digital Planner to GoodNotes in the tutorial below.
We may get commissions for purchases made through links in this post. For more information go to Disclaimer & Disclosure.
How To Add Digital Planners To GoodNotes
There are 2 ways in which you can add a new document to your GoodNotes app.
I suggest you try them both and then stick with the one you find the easiest and quickest.
1. Open file from inside GoodNotes
The first one is from inside the application.
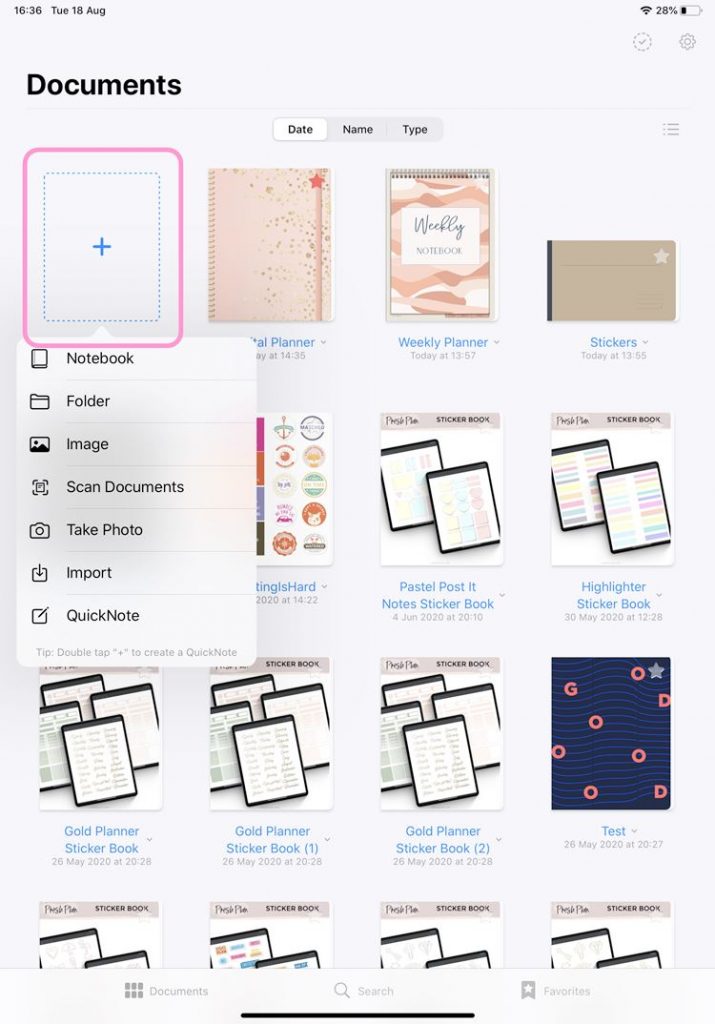
To start simply click on the ‘plus’ sign to add a new document.

You can start a new Digital Planner from scratch inside the app by creating a new notebook or planner. This can be fun as the app has a few options in terms of paper styles. But if you have a digital planner with hyperlinked tabs like I have then you want to import a new document.
When you click on ‘import’ a window will open. Locate your file inside your device from there..remember it can also be stored in the cloud. When you find it, just click on the file and it will open inside GoodNotes.
Want To Learn More? Check Out More GoodNotes Tutorials Here
2. open A file from the folder
The second way to add a new digital planner to GoodNotes is to first locate your file.
It might be located in your downloads or photo folder. In my case, it’s on my one drive.
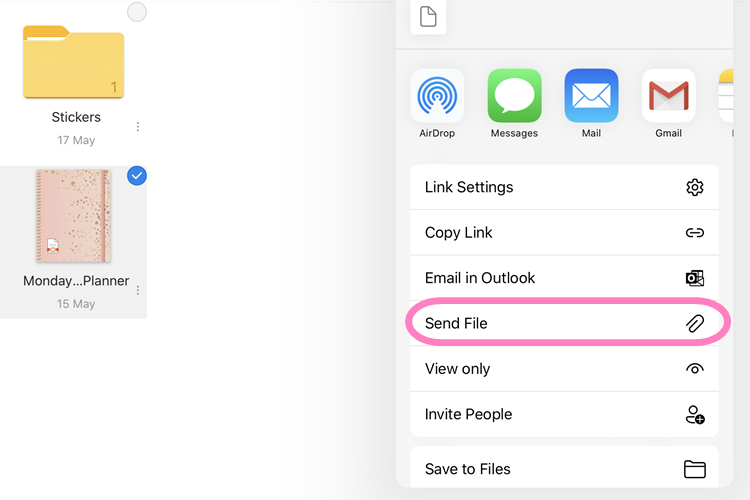
Now you must select the document by tapping and holding. Then click ‘share’ at the top of the screen.

Sometimes you find the app that you need to use on the carousel area that appears here or you might find it by pressing the 3 dots at the end.
However, if it isn’t available in either of those spots then you will need to tap on ‘Send File’ in the dropdown menu.

You should be able to find the compatible app in this window, so you may need to scroll down if it isn’t one of the top apps showing.
Then click on ‘Open in GoodNotes’.

Next open GoodNotes. When the app is open tap on ‘import as new document’, and now you should see it in your documents area.
And those are the 2 easy ways you can import a new digital planner to GoodNotes. Be sure to check out my other GoodNotes tutorials at the end of this post.
Want To Learn How To Create Your Own Digital Planner?
Learning how to make a digital planner isn’t as hard as you think. Check out this super easy-to-follow course below.
More GoodNotes Digital Planner Posts
PIN FOR LATER!


