Wondering how to use beautiful fonts in your digital planner? Here’s a step-by-step tutorial on how to install fonts on iPad.

We may get commissions for purchases made through links in this post. For more information go to Disclaimer & Disclosure.
I think one of the best things about Digital Planners is that you can fully customize them to suit your style and taste. Adding a custom font is a super-easy way to really make your Digital Planner something you love to use and look at.
Find out just how easy it is to download fonts to iPad then upload them to your Digital Planner with this step-by-step “How To Install Digital Planner Fonts” tutorial.
Although you can create your own Digital Planner sometimes it can be quicker and easier to customize a premade Digital Planner template. You have probably done this with Digital Stickers and other items like digital binder rings and digital paper clips but using a font you love can really take your planner to the next level.
Keep reading to see just how easy it is to install fonts on iPad and how to use them in your Digital Planner.

How To Download Fonts On iPad
New to Digital Planning? Even if you are a total beginner it is so easy to install new fonts onto your iPad. Just follow the simple how-to download fonts for iPad tutorial below.
You may also like: How To Create A Realistic Digital Planner
1. Download the iPad font app
You will need a font installer app to install any new fonts onto your iPad. These can be paid apps or free and are available on the app store on your iPad.
There are different apps to choose from but they all primarily work in the same way. If you want a basic free font installer app (and don’t mind advertisements) then I would try iFont.
If you want to try a different app, I would just make sure that they can install .ttf (TrueType) and .oft (Opentype) formats and support .zip files.
2. Decide What Fonts You Want To Use
Here is the fun part! Choosing what fonts you want to use in your Digital Planner.
Here are the simple ways you can find fonts to download using the iFont app.
Open up iFont and at the bottom of the screen in the app, you can see ‘Font Finder‘. Tap on this and you can see the fonts that are available directly through the app and also from Google’s font library.
You can search by name if you know what font you like or have a browse to find new ones. When you find the font you love simply tap ‘Get‘ and it will download the font to your iPad.
You will find the downloaded fonts in your ‘Imported fonts‘ tab.
Or find fonts you like online and then download them to your iPad. You will need to go to a font website to do this but this is very easy with just a quick search engine search. It is important to note that some fonts need to be bought but there are also lots of free fonts available too.
You can also buy font packages on sites such as The Creative Market and The Hungry JPEG.
If you choose to go through a website rather than the app directly you should be able to find a ‘Download‘ button on the font you have chosen. An option will come up to then open in iFont (be sure to have downloaded the iFont app before choosing the font!)
If you don’t see this option, simply go to the Files app on your iPad, then tap and hold where you see the font file you downloaded (this will usually be a ZIP file). ‘Share‘ should come up and then you can select ‘Copy to iFont’.
3. Install The Fonts On iPad You Have Chosen
Unfortunately just downloading fonts won’t automatically install into your Digital Planner. You will first need to add the fonts to the iPad. Luckily this is very easy to do.
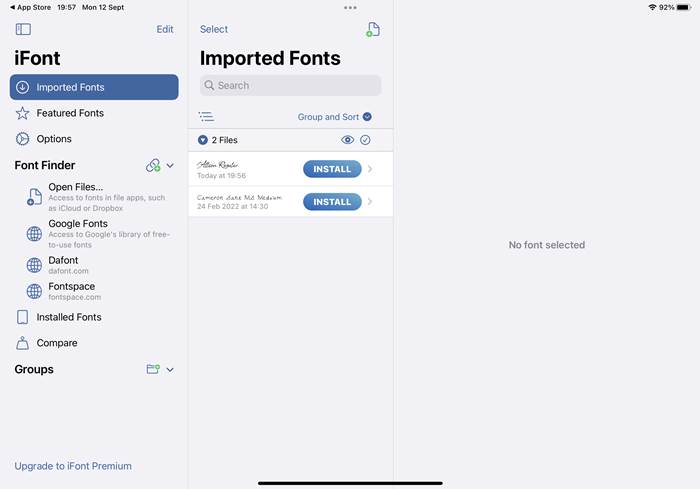
Head into the iFont app screen. On the left side find the ‘Imported fonts‘ tab. Here the fonts you have already downloaded will show up automatically.

Select the font you want to install from the list and tap to ‘Install‘. Just tap to start the installation. Picked more than one font? Just tap on “Bulk Install” and select all the fonts you have picked.
From here a handy tutorial should come up on the iPad that you can follow along. You will also be asked to name the new font profile you are trying to install.
When you see a message come up stating the website is trying to open settings to download a configuration profile just press “Allow” to continue the font installation.
Once it has been completed come out of the iFont app and next go to your Settings App. Where you see ‘General‘, tap. A section with ‘Profiles‘ will come up. Here find the new font profile you just named, tap, and select ‘Install‘.

Your iPad will ask for your security PIN or password. It is important here to check that you are only installing safe fonts into your device by reading the information after “More Details“. Be sure to do this before tapping install again. Using fonts from the iFont app and trustworthy font websites is recommended!
Important Note: With your new fonts on your iPad you can use them for other programs such as Pages and Keynote! Unfortunately, you still won’t be able to use it as your iPad system font though.
How To Uninstall A Font From Ipad
Decided you don’t like or need a font anymore? It is just as easy to uninstall a font from your device as install one.. actually, it may be even easier!
Head to the Settings App on your iPad. Find the ‘General‘ and tap. Next, go to ‘Profiles‘. Find the font that you no longer want and simply tap ‘Remove Profile‘.
Digital Planner Fonts
Now to the best part!
How to use the fonts in your Digital Planner.
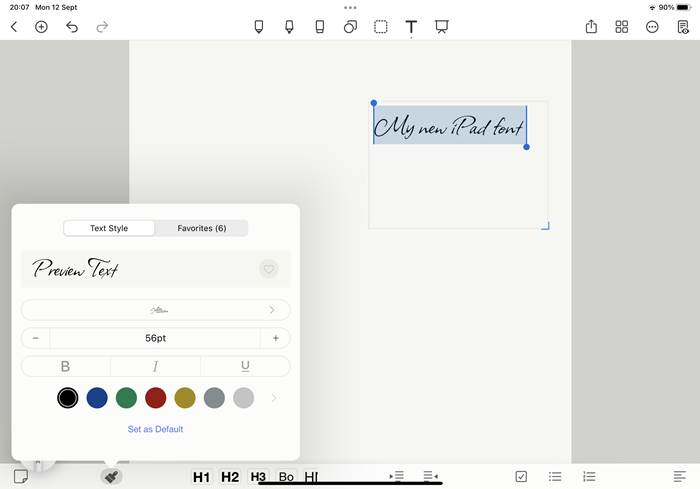
How To Use Digital Planner Fonts
All you need to do is go to the app you use for your planner (such as Goodnotes or Noteshelf). Tap on the fonts section. The fonts you have downloaded will be on the list and ready for you to use and get creative with.
Free iPad fonts I Love
Here are some of my favorite free fonts for iPad that I use in my own Digital Planners.
More digital planning tutorials:


PIN FOR LATER!
